When I first started using Watchful Dashboard to secure, update, and backup my Joomla websites, it took me a little time to figure out the remote backups because Watchful’s FAQ on the subject is not up to date. Plus I received some errors because I needed more configuration. So I wanted to document those instructions here.
I’m assuming here you already have the Watchful extension installed and the site added to your dashboard.
So here are my instructions for Joomla 3.x and Akeeba version 4.x:
- Make sure that you have Akeeba Backup installed and your backup profile configured on your Joomla site. (If you don’t have it installed and have Joomla 3.x you can add the Akeeba Backup extension from the Install from Web tab under Extensions Manage. In fact it comes up for me as one of the popular extensions when I first open the tab. You will need to configure your backup profile.)
- Go to Components -> Akeeba Backup in your Joomla site. Click on the Options gear in the upper right.
- Click on the Front-end backup tab – the tab next to the Permissions tab.
- Change “Enable front-end and remote backup” to “Yes”
- Change “Enabled failed backups check from the front-end” to “Yes”
- Add a Secret Word. Akeeba wants this to be long and complex. You will need to copy this word for entry into the Watchul dashboard but after the site is connected to the dashboard you won’t need to remember it. So consider using a random password generator. Or sometimes I enter something simple and then Akeeba will generate one for me.
- Click “Save and Close”
- If your secret word is not secure enough you will get a warning from Akeeba, that the front-end backup has been disabled and suggesting a secret word.
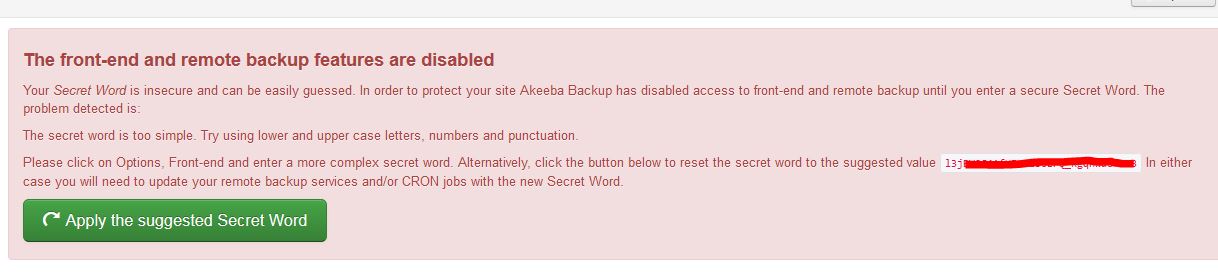
- Click “Apply the suggested Secret Word.” You will get a message that the secret word has been changed and display the word for you to copy. It is also stored in your Options / Front End tab if you need it again.
- Akeeba will have re-enabled the front-end backup at this point so you don’t have to go back into your Options.
Watchful Set Up
- Go to your Watchful dashboard and open up the site dashboard by clicking on the arrow next to the site.
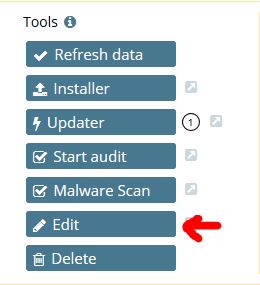
- NOTE: It really confused me that I could not see a Backup button when I first started using Watchful. That’s because the Backup button will only appear AFTER you have set up the Akeeba remote client with the Edit button.
- Click on the Edit button which is second from the bottom
.
- Under Backup enter the secret word you copied.
- Click the Save button so it can connect to your site.
- Once it connects, your Akeeba profiles will show up. Select the profile that you want.
- In the Task Scheduler at the right, you can select the schedule for automatic backups if you want.
- Click Save and Close when you are done.
- Now you will see a Start backup button that shows up under the Updater button.

- I recommend clicking the Start backup button to run a backup just to make sure everything is working okay.
- If everything is okay, a window will pop up showing a list of your previous backups. You will see
- Initialisation
- API Version Check: OK
- Backup for site xxxxxxxx started
- The backup will run. You will see the following when it is complete:
- 100%
- Finishing..
- Finishing..
- Done
- And the new backup will show up the list of backups with a description of “Watchful Automatic Backup”
- At that point you can close. You are all set up!
Troubleshooting:
Here are some possible points of issues:
- If you run the backup and you get an error saying “ERROR: Cannot step backup for site [name of site]”, check to make sure that you have the front-end backup enabled in Akeeba.
- If you don’t see your Akeeba profiles, make sure that you have the front-end backup enabled in Akeeba and that you have saved the Watchful backup configuration with the secret word.
- If you don’t see the Start backup button, make sure you have set up the secret word and backup connection in the edit button.